Photoshop actions are enjoyed by many, and are useful in so many ways. Whether you want to speed up your workflow, or creatively edit photos, they do come in handy. Press the Play button and there it goes! A little miracle of it’s own! All the layers are there, all you need is adjust a bit, here and there.
Many actions are available for you to choose (Psst! Right sidebar, easy peasy!), but sometimes, you have that recipe you like, one you created and the one that works for your editing style the best. How do you record it in order to save it for future use, and also, to save some time? I’ll walk you through it. We’ll start by a step-by-step guide on how to actually record the actions. You have that amazing tool at your fingertips, it’s time you put it to good use! Then, I’ll add my tips on how to build your own creative actions. Sounds good?
First, you have to keep in mind that at this time, you can only record actions in PS. Not PSE. You can run actions written in PS in PSE, given they were recorded with commands that PSE will recognize.
Actions will record every command given to them, you can see all the steps within the action when you use the develop button. You will see commands appear while you record, and that’s where you go back and delete if you mess up.
Okay, let’s get started! If you want to record your own actions, you will need to have your actions panel open (Window > Actions). Open a photo, any photo. We need to have a file opened in order for the commands to run as we record them. Look at the bottom of the actions panel, you will recognize three buttons, square, circle and triangle. Square is Stop, circle is Record, and of course, triangle is Play.
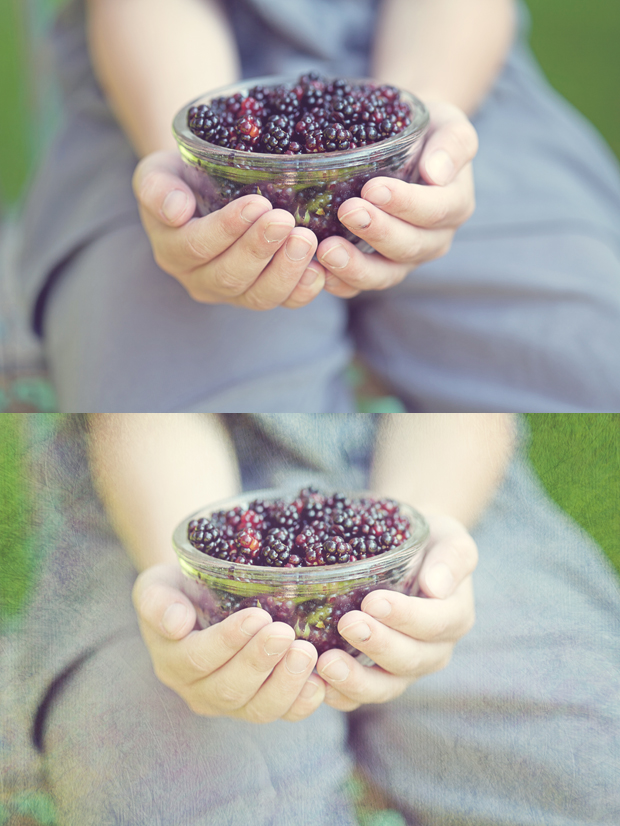
For the sake of this exercise, we will write and record together a basic enhancing action. Once recorded, you get to keep it, nice hey?
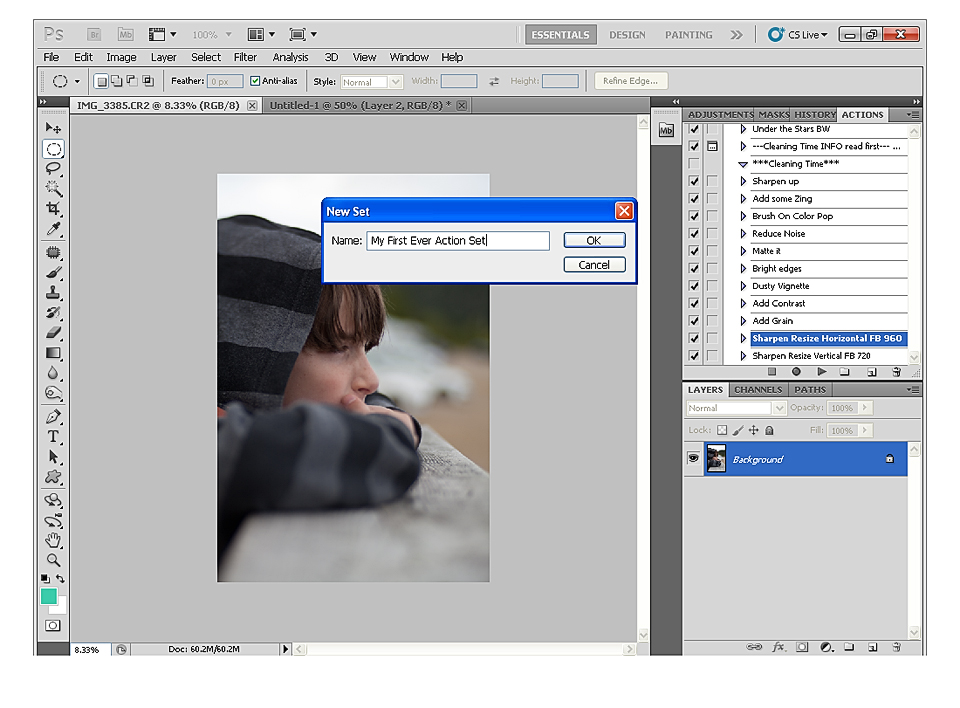
Go to your actions panel, and find the drop-down menu at the top right and select New Set.

Actions need to be recorded in sets, not as stand-alone. You can have only one action, but it needs to be in a set. Now, name this new set. I named it My First Ever Action Set.
With that set created, make sure it’s selected, go back to the drop-down menu and select New Action. A new action will be added to the selected set. Name this action. I decided to name it WOW. In order to save it you will be required to press RECORD.

Once done, be extra careful, because PS is now recording your every move!! You will have confirmation by looking at the Record button, it’s now red, meaning it’s active and recording. In order to be able to take your time and try the adjustments you want before actually recording them, go press the Stop button. And breathe.
Now is the time to record every adjustment you want to include in your action. Press the Record button when you’re ready to go. I strongly suggest you press Stop after every adjustment. That way PS will not record everything you click, slide or adjust in between recording commands. Believe me, if you forget, and you will! You will end up with a pretty funky and lengthy action. But it’s part of the learning process, so don’t worry.
If you already have your own recipe, go ahead and record it! The rest of us are going to go on with our WOW action.
Ready? Sure? Press Record. Go to your layers palette and select a Curves adjustment layer. We will start by a simple midtones lift curve. I worked on the RGB curve and didn’t went too strong, a soft lift. Output value at 142 and Input value at 112. Once done, I can name my new adjustment layer, while still recording. I went with “Curves”. Press the Stop button.
Next step is adding a little color boost. Press Record and make a Hue/Saturation adjustment. I went with a +12 value in Saturation, and named the layer “Color Boost”. Press Stop.
Moving on with a little Contrast Boost, press Record again, and add a Brightness/Contrast adjustment layer. Up the Contrast to 25. Name your layer, press Stop.
My final step when creating an action, is to group the layers, and name the group after the name of the action. Press Record, select all adjustment layers, and press Ctrl+G (Or click on the folder icon at the bottom of the layers palette). Name your group, and press Stop for one last time.
It’s a pretty basic action, I’ll give you that, but it serves it’s purpose. And after three recorded adjustments, I think you can handle the rest on your own.
Things to remember when recording your own actions:
-Press Record and Stop!
-Name and group your layers, avoid clutter.
-If you messed up, press Stop. Go within your action and delete the last command you recorded, as well as it’s layer and start over again.
-Save your actions on a folder or on a hard drive, you never know!
-Try new effects, experiment and have fun. That’s how you learn.
Useful tips on designing creative actions:
-Go mid-range opacity on your layers, or go subtle on your adjustments. Keep in mind that not one image is the same. If you record your actions for your own personal use, and you shoot consistently, do as you please. But if you plan on sharing… Go subtle! You may tend to underexpose, while others tend to overexpose, a too strong adjustment will create chaos!! If you want more people to benefit from your work, make sure it works for THEM as well.
-Adjust every layer opacity to customize the effect, while recording. Opacity changes gets recorded just like any other command, and it’s pretty useful.
-Add layer masks on every layer (while recording). It will allow fine tuning.
-Make sure your actions never flatten the image! I hate that! I want to be able to customize every. single. effect.
-Use adjustment layers most of the time, it doesn’t apply to your background image, but on it’s own layer instead, and it comes with a mask. Do not destroy my background!!
-If you need to use an image adjustment that runs on the background, duplicate it first! Remember, do not alter my original, never!
-There are many different ways to achieve one creative result, try to select the one that is easier to customize for the user, but still effective enough to give good-looking results. For example, Haze or Matte. Many ways to add it to a photo, carefully select the one that will give the user the most control over it.
-Be pixel-gentle. Take care of that background, make sure your actions do not destroy pixels!
-Be careful of the radial gradient. Why? Don’t you hate to see a halo in your image? I see it on many images. Yes, it’s great to add fill light, but make sure your radial gradient blends softly enough it won’t leave a halo (my pet peeve, sorry for that!). I hate having to run a blur over it to smooth it out, take some extra time I don’t have much of…
-That said, make sure your actions do not give the user extra work apart from opacity adjustments or mask painting. It has to run without me having to correct it by running another action on top.
-Be wary of color casts, doesn’t look to great on delicate skin, just sayin’
-Build your actions by covering bases first, like exposure fix and stuff, then add creative adjustments on top. Like icing on the cake, but don’t go too sweet.
-Be creative! Be your own kind of unique! Experiment first, take notes to be able to replicate the effect later.
-Educate yourself! I could never say this enough. Many tutorials by professionals are out there, use them. Then when you’re comfortable with the process, personalize the effects so it fits who you are and who you want to share your actions with. The web is a treasure trove for amazing resources, start there. Connect with others and be inspired (it’s a treasure trove for LEGAL sources folks! ETHICS will always get you further. It’s the GOLDEN RULE! ALWAYS!).
-Try to be cohesive when creating a set. My art teacher used to compare some artwork to pizza. Too much of everything leaves a bad taste in your mouth. Keep pizza on your plate, not in your work.
-I guess the hardest part is coming up with THE idea that will make your set want to be used by others. What will make it different than the others? How will your style set you apart?
Enjoy and start recording new recipes of your own! And share the love!


You are just FABULOUS for posting this!!! 🙂 I want to try to make some actions…and this is the perfect tutorial to get me started. Thanks!!
I personally want to bookmark this posting, “Isabelle Lafrance
Photography ? Blog Archive ? How to write your own Photoshop
actions – A step by step tutorial” on my own internet site.
Do you mind in case Ido it? Regards ,Franklyn